Property Wrappers - SwiftUI
1. @State#
1.1. Basic Concepts#
@State is a property wrapper struct that just wraps any value to make sure your view will refresh or redraw whenever that value changes. References: https://stackoverflow.com/a/59616812/16317008
Always declare state as private, and place it in the highest view in the view hierarchy that needs access to the value. Learn more: https://stackoverflow.com/a/72946113/16317008
@State 修饰的变量声明的时候要初始化, 因为 @State 一般都会被 private 修饰, 在外部通过 init() 初始化会报错, 而 @Binding 修饰的变量声明时不应该有值, 因为它要接受外部的 binding 值, 以便可以修改, 正如文档所表述: A binding connects a property to a source of truth stored elsewhere, instead of storing data directly.
@State private var isPlaying: Bool = false
@State private var itemList = [
        Item(name: "Apple", count: 1),
        Item(name: "Banana", count: 2),
        Item(name: "Cherry", count: 3)
    ]
@Binding var isPlaying: Bool
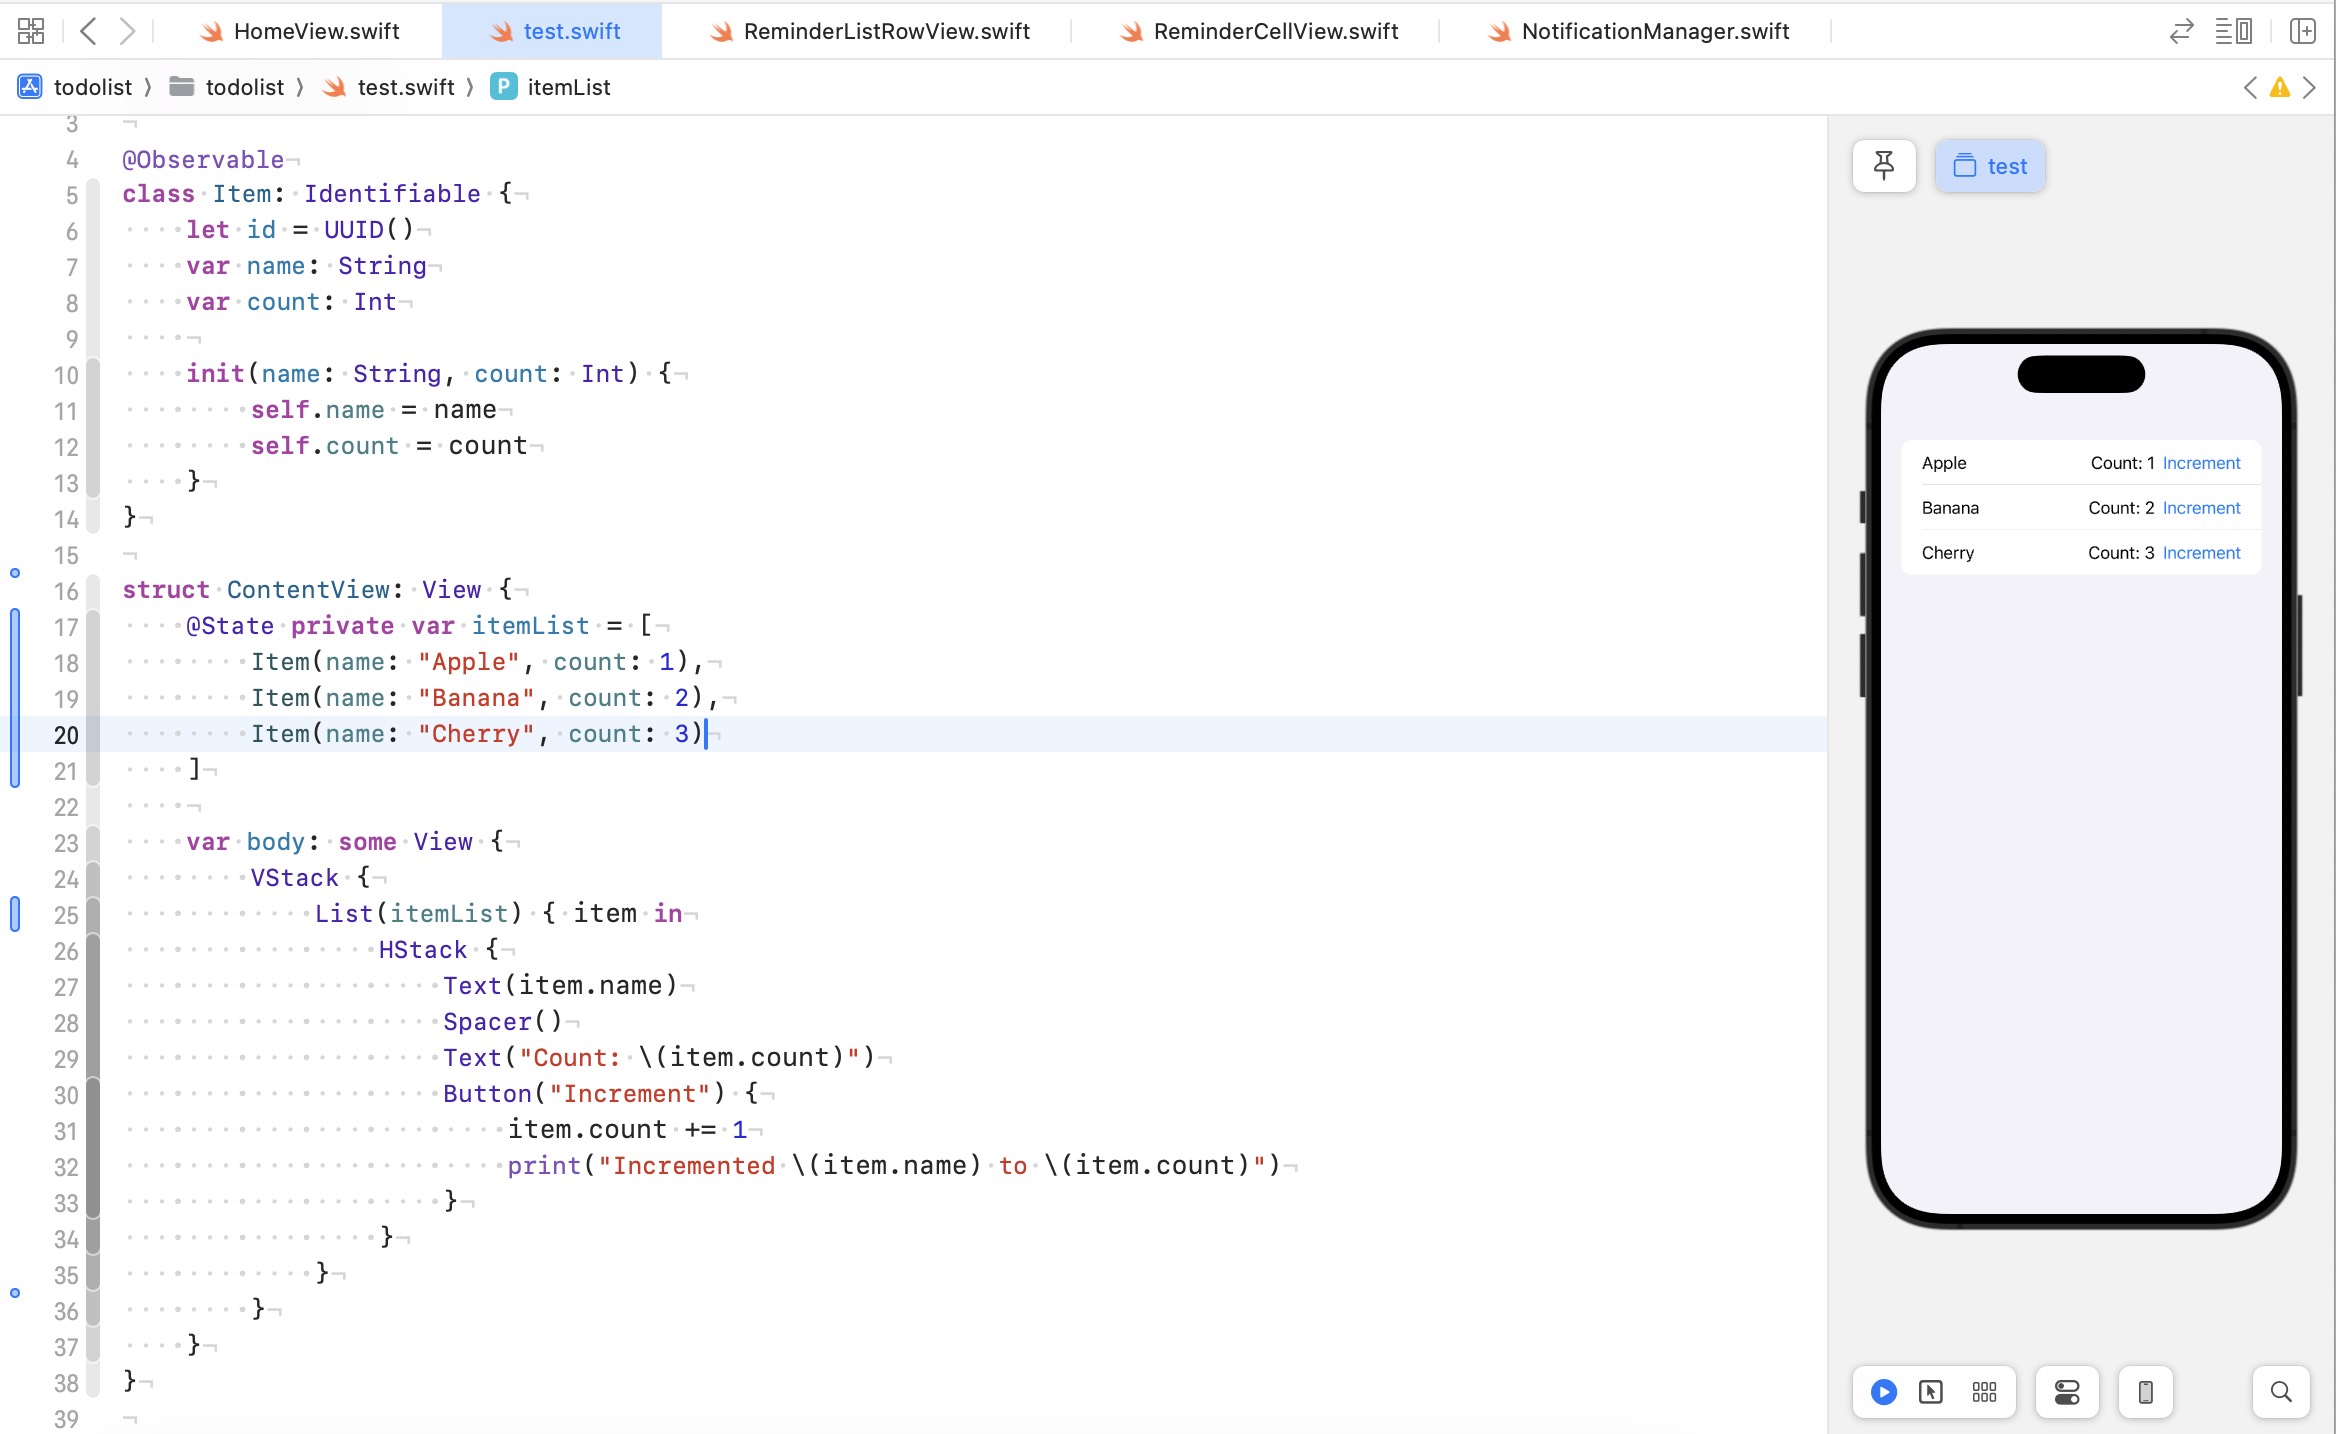
@State 既可以修饰单个值也可以修饰数组, 若想监控数组里元素的属性变化更新页面, 则元素的类型必须是
@Observable
1.2. Step Further#
看到一篇文章可以帮助理解State: 在 SwiftUI 中, 我们使用 @State 进行私有状态管理,并驱动 View 的显示,下面的 ContentView 将在点击加号按钮时将显示的数字 +1:
struct ContentView: View {
    @State private var value = 99
    var body: some View {
        VStack(alignment: .leading) {
            Text("Number: \(value)")
            Button("+") { value += 1 }
        }
    }
}
当我们想要将这个状态值传递给下层子 View 的时候,直接在子 View 中声明一个变量就可以了:
struct DetailView: View {
    let number: Int
    var body: some View {
        Text("Number: \(number)")
    }
}

struct ContentView: View {
    @State private var value = 99
    var body: some View {
        VStack(alignment: .leading) {
            DetailView(number: value)
            Button("+") { value += 1 }
        }
    }
}
在 ContentView 中的 @State value 发生改变时,ContentView.body 被重新求值,DetailView 将被重新创建,包含新数字的 Text 被重新渲染。
另外还有一些想说的, 看下面代码:
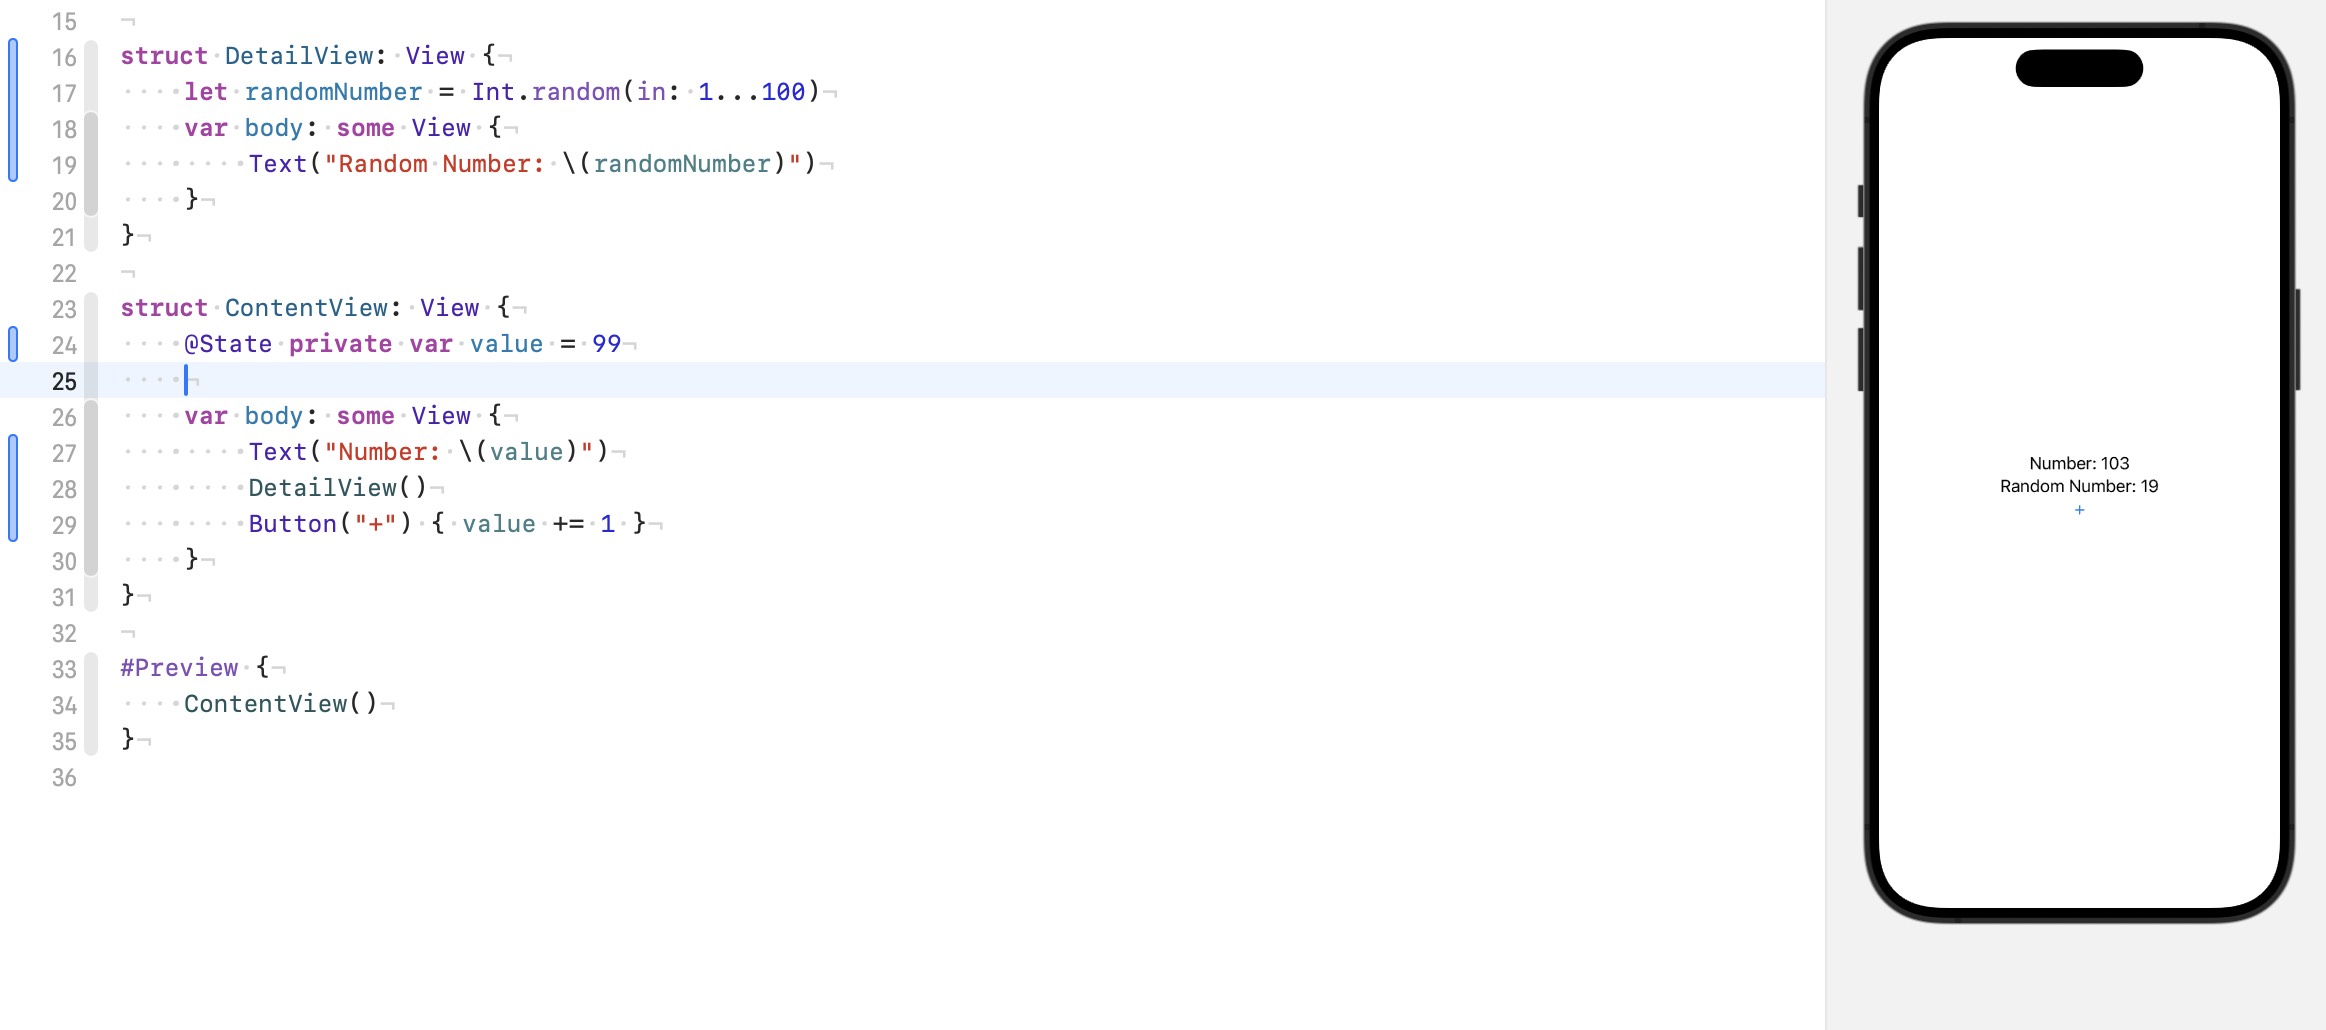
每次点击按钮, DetailView 的数字也会变化, 这就意味着每次 ContentView 被重新渲染的时候, 它的子 view 也被重新渲染了, 可是根据官方文档表述: When the @State value changes, SwiftUI updates the parts of the view hierarchy that depend on the value. 可是子 view DetailView 并没有依赖 @State value, 为什么还会被更新呢, 难道说每次 view 更新都会带着更新他的所有子 views? 答案是: 对的, 所以每次我们要把一个View分成好多 subviews, 这样才能更好的控制更新的粒度, 而不是每次更新都全部重建, 了解更多: swift - Why does one child view in SwiftUI re-render on parent state change but another doesn’t? - Stack Overflow
SwiftData 补充:
@Model=@Model+@Observable,@Query=@State+@Query另外修改
@Query标记的数组内的元素属性, 框架会自动保存到数据库, 但肯能会延迟, 想要立即生效, 需要使用 context强制立刻保存.
2. @Published#
⚠️ The
@ObservableMacro was first introduced during WWDC 2023 to replaceObservableObjectand its@Publishedparameters. It is now recommended to use theObservablemacro to create observable objects. Click to learn more
In practical terms, that means whenever an object with a property marked @Published is changed, all views using that object will be reloaded to reflect those changes.
Learn more: SwiftUI Data Flow in iOS 17 - Observation & @Observable - YouTube
MVVM: SwiftUI - Intro to MVVM | Example Refactor | Model View ViewModel
3. @Binding vs @Bindable#
SwiftData: @Bindable 即可将修改数据的数据实时保存到数据库 不用调用 context 其它函数
@Binding 用于创建对某个值的引用,允许子视图修改父视图中的状态。它主要用于简单的值类型,如 Bool、Int、String 等。
struct ParentView: View {
    @State private var isOn = false

    var body: some View {
        VStack {
            Text("Switch is \(isOn ? "on" : "off")")
            ChildView(isOn: $isOn)
        }
    }
}

struct ChildView: View {
    @Binding var isOn: Bool

    var body: some View {
        Toggle("Toggle Switch", isOn: $isOn)
    }
}
有时候也可以直接传递引用
struct ContentView: View {
    // Book 是 class 不是 struct
    @State private var book = Book()
    var body: some View {
        BookCheckoutView(book: book) // 直接传递引用给子视图
    }
}

struct BookCheckoutView: View {
    var book: Book
    var body: some View {
        Button(book.isAvailable ? "Check out book" : "Return book") {
            book.isAvailable.toggle()
        }
    }
}
@Bindable 是在 iOS 17 中引入的,用于处理遵循 Observable 协议的引用类型对象。它允许在视图中直接绑定到可观察对象的属性。
@Observable class UserProfile {
    var name: String = ""
    var age: Int = 0
}

struct ProfileView: View {
    @Bindable var profile: UserProfile

    var body: some View {
        Form {
            // 绑定 profile 的 name 和 age 属性, 与上面 Book 例子不同, 这里绑定的是对象的属性, 而不是修改
            TextField("Name", text: $profile.name)
            Stepper("Age: \(profile.age)", value: $profile.age)
        }
    }
}

struct ContentView: View {
    @State private var userProfile = UserProfile()

    var body: some View {
        ProfileView(profile: userProfile)
    }
}