我的 Mac 常用配置
1. 软件#
-
清理🧹: AppCleaner
-
截图🖼️: CleanShotX, Snipaste ScreenShoot
-
视频播放器📺: VLC , iina
-
效率💼: Raycast AI (Youtube Downloader, Twitter Downloader, Clipboard, Quick Emoij)
不要安装 iStats, 会导致电脑休眠的时候会发热, 现代 SSD 使用闪存(Flash)技术, 每个存储单元是通过向浮栅极注入或抽离电子来存储数据, 这个物理过程会导致绝缘层逐渐退化, 每次写入都需要高电压来迫使电子穿过绝缘层, 绝缘层会因此逐渐被损坏, 最终会影响单元保持电荷的能力, 频繁睡眠, 可能会把内存数据写到 SSD, 这样反而会影响 SSD 寿命,
RAM 使用 MOSFET 晶体管和电容的组合, 电容充电代表1, 放电代表0, 读写操作只是简单的充放电过程, 没有高压操作, 不会对硬件造成累积性损伤, 有的 Mac 设置 standby (深度睡眠) 模式, 只是为了电池健康, 因为电池显然更不耐用, 对于 Mac mini, 其实并不需要, 但这会把 RAM 内容写入到 SSD, 对 SSD 其实是不好的, 至于普通的睡眠, 并不会把 RAM 写入到 SSD, 所以你要是担心 不睡眠 会对 mac RAM 有损耗 (因为 RAM 一直通着电), 那你的想法是没必要的,
# 查看什么影响休眠
$ pmset -g log | grep PreventUserIdleSystemSleep

# 睡眠 电脑总是发烫, sudo pmset -a tcpkeepalive 1 取消设置
$ sudo pmset -a tcpkeepalive 0
Warning: This option disables TCP Keep Alive mechanism when sytem is sleeping. This will result in some critical features like 'Find My Mac' not to function properly

# 禁止 Mac 在睡眠时执行一些后台任务:检查邮件更新 同步 iCloud
# https://support.apple.com/en-ca/guide/mac-help/mh40774/mac
$ sudo pmset -a powernap 0

# 查看SSD写入量
$ smartctl -a disk0
2. iTerm2#
2.1. 基础设置#
-
Setting themes: go to settings:
Appearance > General > Theme: Minimal -
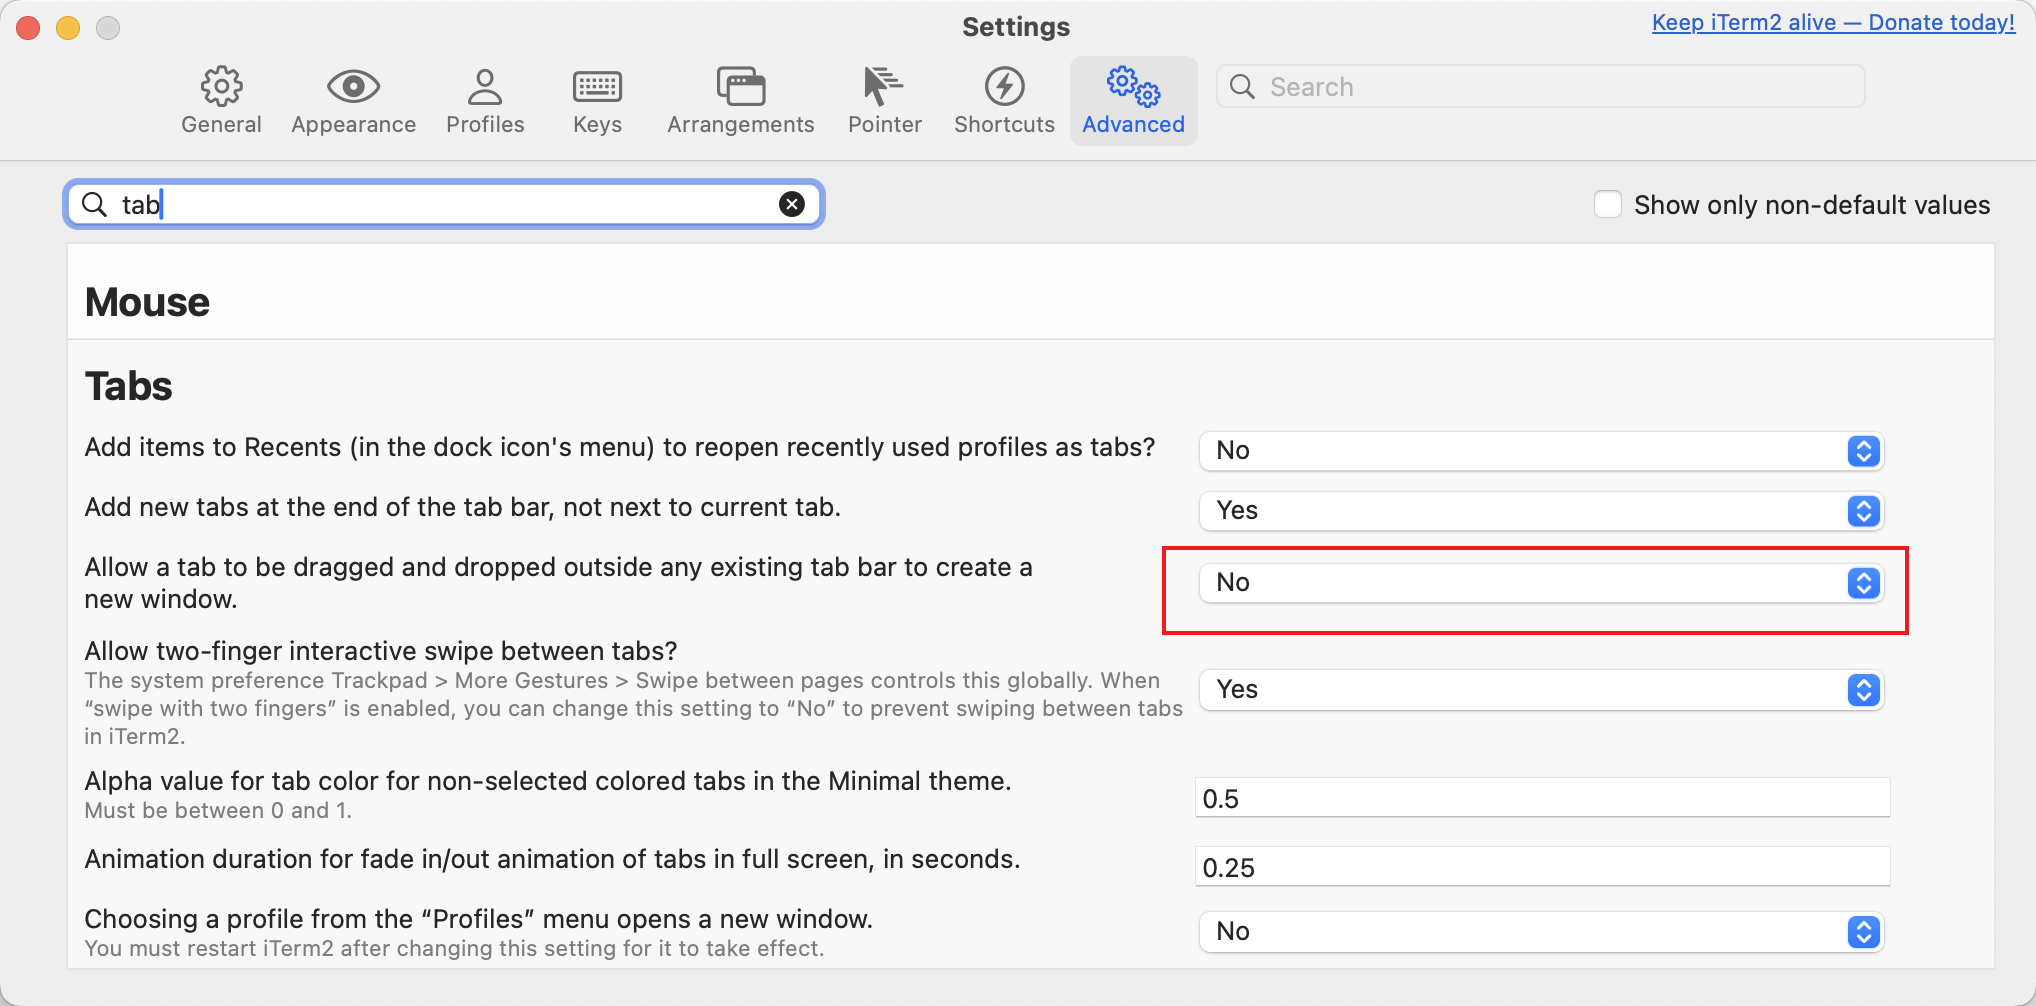
Remove annoying outlines on tabs, go to settings:
Advanced

- Setting color to Github:
$ curl -Ls https://raw.githubusercontent.com/mbadolato/iTerm2-Color-Schemes/master/schemes/Github.itermcolors -o /tmp/Github.itermcolors && open /tmp/Github.itermcolors
Then go to settings: Profiles > Colors > Color Presets: GitHub
- Install Oh My Zsh
# Oh My Zsh
sh -c "$(curl -fsSL https://raw.github.com/ohmyzsh/ohmyzsh/master/tools/install.sh)"
- auto suggestions
git clone https://github.com/zsh-users/zsh-autosuggestions.git $ZSH_CUSTOM/plugins/zsh-autosuggestions
Edit .zshrc file, find plugins=(git), append two plugins:
plugins=(git zsh-autosuggestions)
- Final Version
.zshrc:
# 定义常用路径变量
CUSTOM_SCRIPTS="$HOME/.my_scripts"
# 安装 pnpm 和 nodejs 之后才可以用, 安装方法可参考笔记 frontend/next-js.md
#PNPM_HOME="/Users/david/Library/pnpm"
#NODE_PATH="/opt/homebrew/opt/node@22/bin"

# 定义函数: 仅当路径不存在时才添加到PATH
add_to_path() {
    if [[ ":$PATH:" != *":$1:"* ]]; then
        export PATH="$1:$PATH"
    fi
}

# 按优先级添加路径
#add_to_path "$NODE_PATH"      # Node.js
#add_to_path "$PNPM_HOME"      # pnpm
add_to_path "$CUSTOM_SCRIPTS" # 自定义脚本


# ZSH 是个(全局)变量定义了 oh-my-zsh 的安装路径
# 使用 export 是因为其他子进程(如插件脚本)也需要知道这个位置
# 如果去掉 export,其他脚本可能访问不到这个变量
export ZSH="$HOME/.oh-my-zsh"

# ZSH_THEME 定义主题,这是个普通变量,不需要 export
# 因为只有 oh-my-zsh.sh 主脚本需要读取它
ZSH_THEME="ys"

# plugins 定义需要加载哪些插件,也是个普通变量
# 只在 source oh-my-zsh.sh 时被读取一次
plugins=(
    git
    zsh-autosuggestions
)

# 执行 oh-my-zsh 的主脚本,它会:
# 1. 读取上面的配置变量
# 2. 加载指定的主题
# 3. 加载所有列出的插件
source $ZSH/oh-my-zsh.sh

# 加载 API KEY
if [[ -f ~/.config/zsh/secrets.zsh ]]; then
    source ~/.config/zsh/secrets.zsh
fi
2.2. 字体配置#
Change font of iTerm2 otherwise you will see some weird characters in nvim.
# https://formulae.brew.sh/cask-font/
❯ brew install --cask font-jetbrains-mono-nerd-font
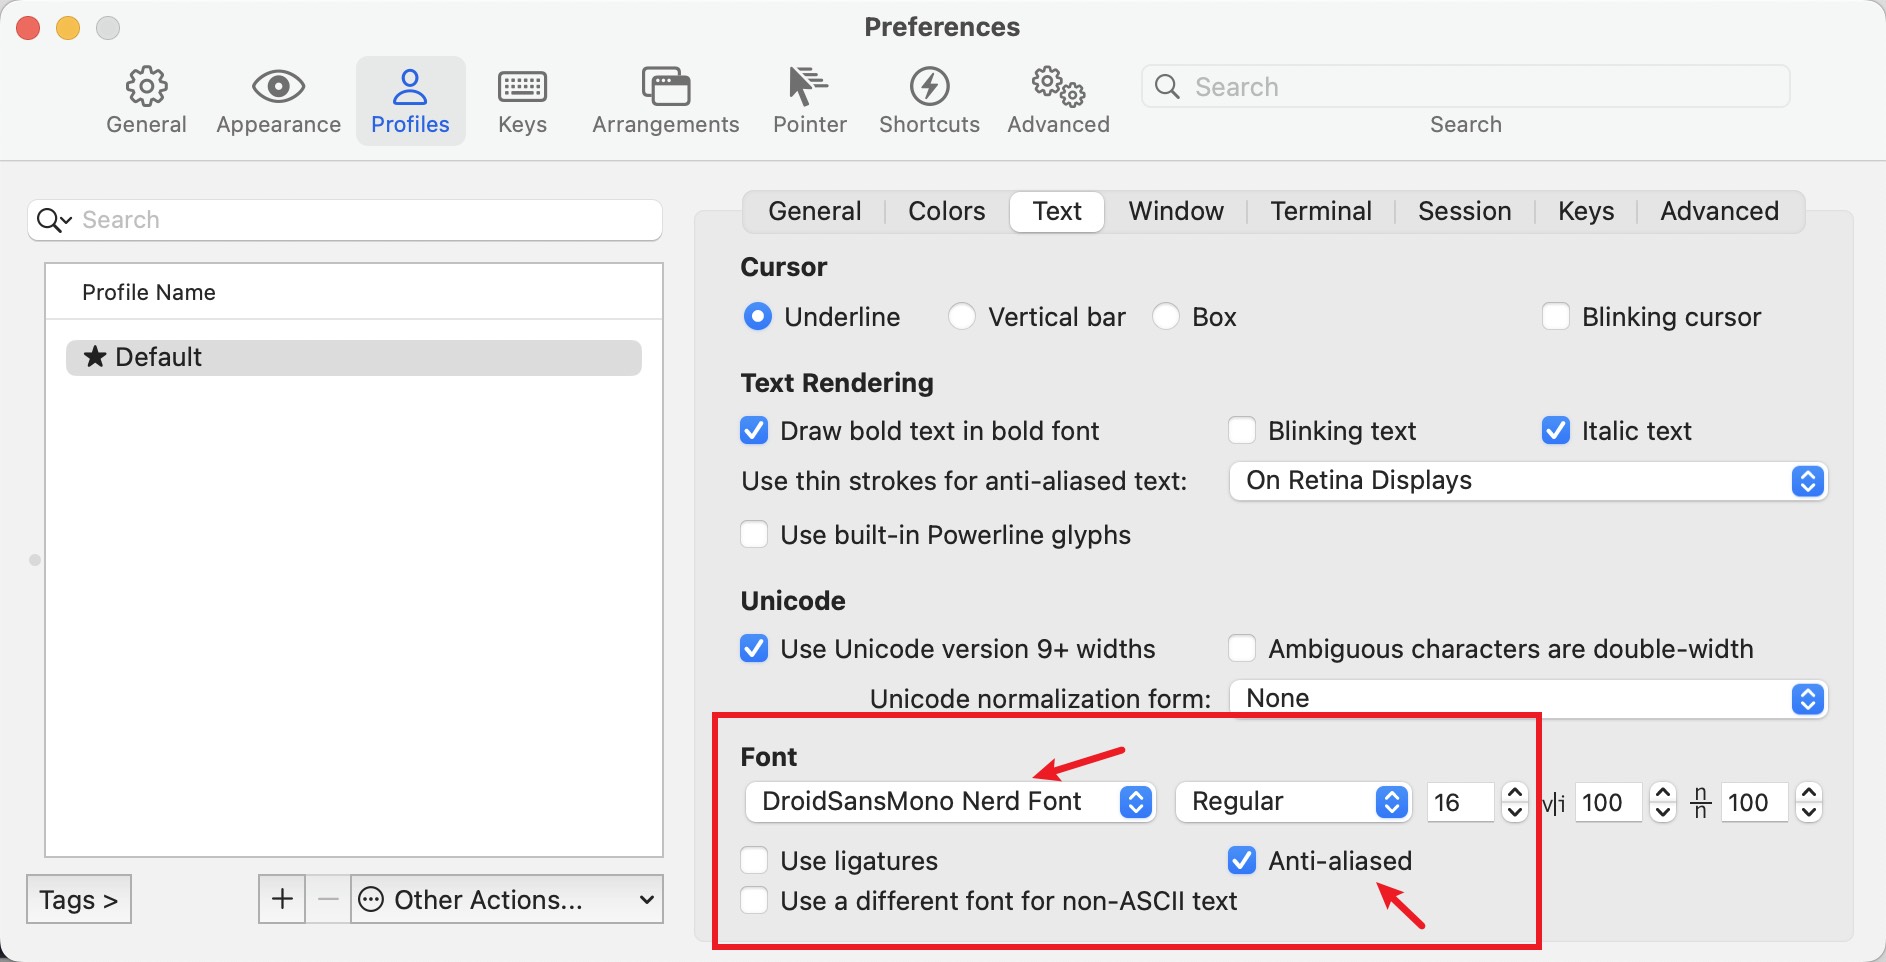
Then set the font in iTerm2 Preferences: Profiles > Text > Font: jetbrains-mono-nerd, 注意选择 nerd font, 不要选择 jetbrains-mono-font:
3. Nvim#
3.1. 基础设置#
brew install neovim
echo "alias vim='nvim'" >> ~/.zshrc
echo "alias vi='nvim'" >> ~/.zshrc

# Install NvChad
git clone https://github.com/NvChad/starter ~/.config/nvim && nvim
到 ~/.config/nvim/lua/plugins/init.lua, 删除原内容, 直接拷贝,
return {
 {
   -- 代码格式化插件 - 可以自动格式化各种语言的代码
   -- 可以配置使用不同的格式化工具(例如 prettier, stylua, black 等)
   "stevearc/conform.nvim",
   -- event = 'BufWritePre', -- 取消注释这行会在保存时自动格式化
   opts = require "configs.conform",
 },
 {
   -- LSP(Language Server Protocol)配置插件
   -- 提供代码补全、跳转到定义、查找引用、错误提示等功能
   -- 支持多种编程语言,每种语言需要安装对应的 language server
   "neovim/nvim-lspconfig",
   config = function()
     require "configs.lspconfig"
   end,
 },
 {
   -- GitHub Copilot 插件 - AI 代码助手
   -- 可以根据上下文自动生成代码建议
   -- 需要 GitHub 账号并订阅 Copilot 服务
   "github/copilot.vim",
   lazy = false,
 },
 {
   -- 自动保存
   "okuuva/auto-save.nvim",
   version = '^1.0.0',
   cmd = "ASToggle", -- optional for lazy loading on command
   event = { "InsertLeave", "TextChanged" }, -- optional for lazy loading on trigger events
   opts = {
     -- your config goes here
     -- or just leave it empty :)
   },
   lazy = false,
 },
}
启动 neovim, 然后输入 : Copilot setup
3.2. 主题设置#
Chnage the theme of nvim, enter nvim and type space + t + h, choose onenord or github theme.
3.3. 设置游标显示#
Append to .config/nvim/init.lua:
vim.opt.guicursor = "n-v-c-i:hor20"
3.4. 快捷键#
- 显示文件树: 空格 + e
- 全选: ggVG
- 复制: 选择内容后 按 y
- cut: 选择内容后 按 x
4. git#
设置 git 邮箱, 需要与 GitHub 上的邮箱一样, 不然 提交 不会显示在主页的 overview:
git config --global user.email
git config --global user.email "你的邮箱地址"
git config --global user.name "你的名字"
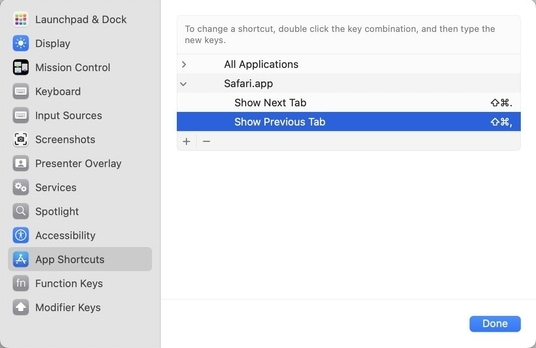
5. 快捷键和电脑设置#
快捷键参考: https://support.apple.com/en-in/102650
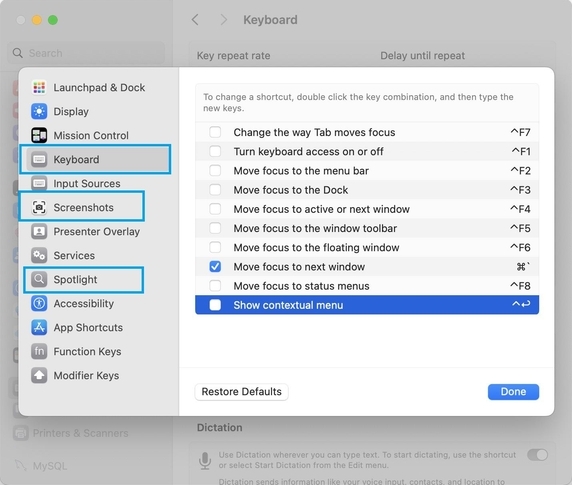
Spotlight Settings

Shortcuts:
6. VSCode#
6.1. Prettier - Code formatter#
搜索设置 Prettier Tab Width 4
设置不对的话, 因为 tab size 不匹配, rainbow indent 可能回标红缩进: https://stackoverflow.com/q/70231635/16317008
6.2. Indent-Rainbow extension#
搜索: Change Tab Display Size, 设置 Tab Size: 4
显示竖线而不是彩虹杠:
"indentRainbow.indicatorStyle": "light",
竖线的粗细:
"indentRainbow.lightIndicatorStyleLineWidth": 2,
there will still be the default vsc indent lines under these, but you can remove by adding this;
"editor.guides.indentation": false,
there is still some alpha to the indent lines, if you want to get rid of that you can change the colors to rgb from rgba (you can mess around with the alpha value if you would like to have slight transparency
"indentRainbow.colors": [
  "rgba(255,255,64,0.6)",
  "rgba(127,255,127, 0.6)",
  "rgba(255,127,255, 0.6)",
  "rgba(79,236,236, 0.6)",
]
You can also toggle the indentation dots in case they went away
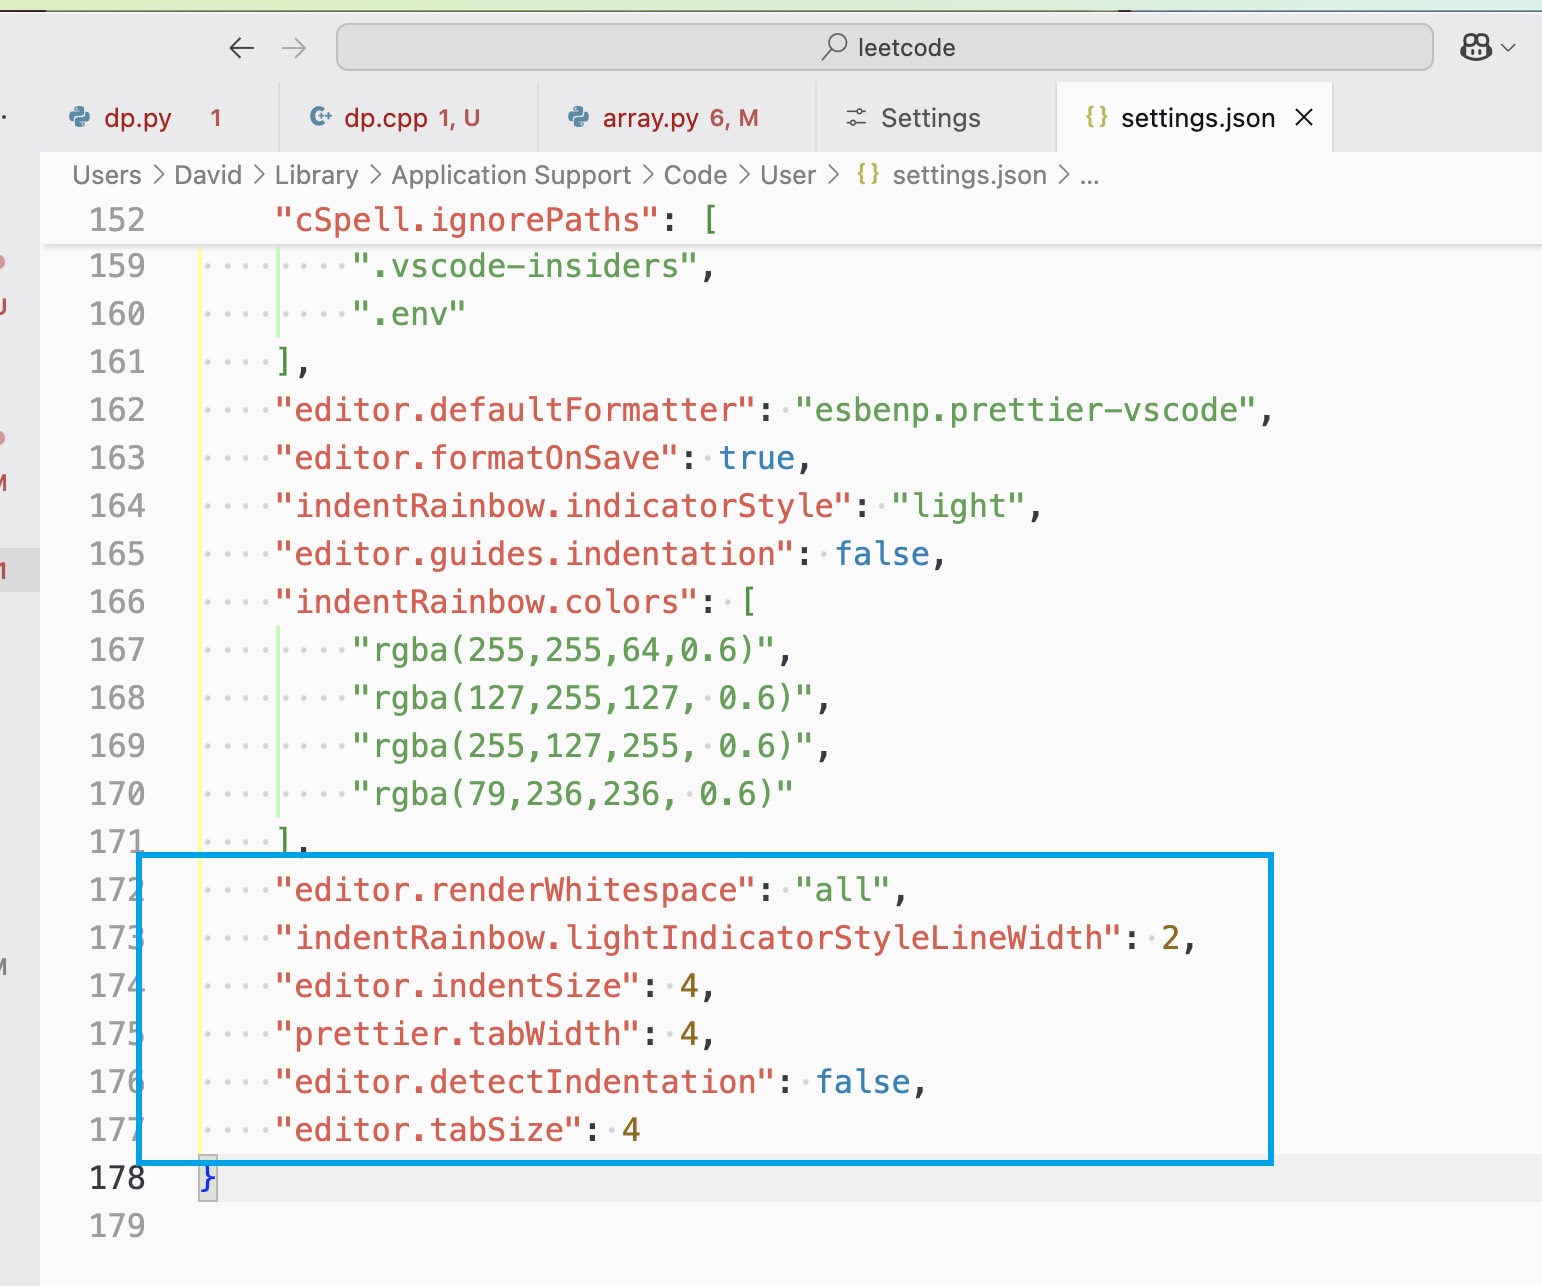
"editor.renderWhitespace": "all",
以上设置均可以通过 vscode 设置搜索找到, 最后 settings.json 的最后部分设置如下: